

If you are like me, you know that having a soldering station at the ready is of a great convenience. In my case, it doesn’t get used enough to justify permanent real estate on my workbench top. This project allows for the quick set up (and take down) of my soldering station in my home workbench, as well as an easy grab – and – go option when I know I am doing some serious soldering at the hackerspace.
I wish to state right from the start that this project was not my idea, but an inspiration of a similar portable soldering station that my friend Rich built to be used at the hackerspace. When I first saw his build in an unused technician case, I thought it was a creative and practical hack, but it wasn’t enough to inspire me to build my own. Then, a few weeks later, I had a quick soldering project to do. I dug out from my shelf the soldering base station, find the stand, then track down my box with the iron, tips, and solder. I immediately thought of Rich’s Grab – and – Go Station and I said to myself it was time to build my own.
I contemplated using my own technician case, or going out the the local goodwill and finding an old style typewriter case. After further thought, I decided to design a similar case with a smaller footprint and overall size than Rich’s technician box design to make it even more convenient on the go. After measuring all the components, I was confident that with some creative mounting, I could obtain similar results in a smaller form factor.

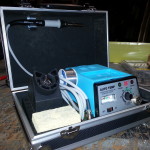
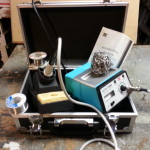
The case I found to create my On-The-Go Soldering Station is a Harbor Freight 11.5” x 7.5” x 4.5” Aluminum Case. My Soldering station is a Xymonic brand (A lower cost Weller like – knock off) that currently fills my needs as a temperature controlled soldering station. As in my friend Rich’s design, the case would be used upside down, allowing the shallow case lid to act as the mounting platform. One would then just open the box and be ready for the soldering task.
While brainstorming on the layout, I decided that I would mount all the interior components on a sturdy platform that would snugly fit into the case. This would allow for further versatility and allow for soldering iron removal if the case was in the way. What would work as a mounting platform? I contemplated using wood, plastic, cutting board teflon, and metal – all of which had weight and size concerns for something that I was aiming to be light and portable. While looking around my shop, I came across and old circuit board. – Perfect! … And what an appropriate reuse of material inside my soldering station .
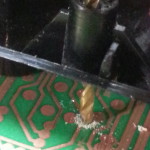
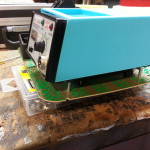
 The bottom of my Xymonic soldering base station has four screws that go upward and are self tapped into the plastic case to hold on it’s top housing. This arrangement made mounting a breeze. I replaced the four existing screws with new, longer self tapping screws that would now enter up through four holes I created in the circuit board. No need to even remove the rubberized base feet, they allowed for shock proofing in the mount design.
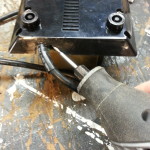
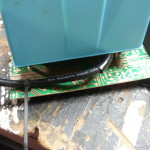
One last base station modification was made to the power cord placement. Because of the constricted space of the case dimensions, I modified the exit hole of the power cord to allow for additional bending without adding strain to the wire. Two more holes and a zip tie cleanly defined the new cord path for the unit.
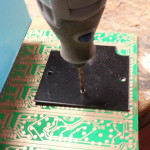
The Soldering Base was able to be mounted without too much modification. I removed the bottom metal plate and drilled two mounting holes though that matched up with the circuit board. The base was reassembled and also attached to the board.
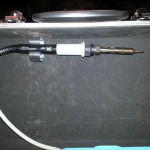
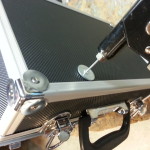
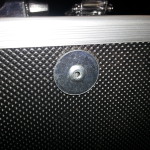
To keep things tidy, and to assure an easy fit into the case, a medium size clip from the local Ace Hardware store was mounted in the top of case to hold the iron. The mount goes in the top of the case and is held in place with a washer and rivet. This was intentionally done to match the outside design of the case so any modifications seen in the closed case matched.
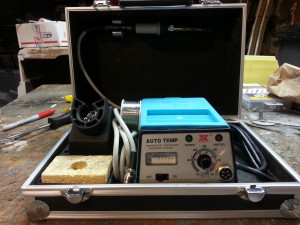
Now, I’m ready to go with my soldering station setup. No more multiple trips to the shelf, and unboxing to get ready to solder. Now, in one easy movement, I grab my solder tool box, open it, drop in my iron to the holder,and plug in my power, and iron. in less than sixty seconds, my soldering is underway.